JavaScript Loves Internet Of Things
JavaScript Loves Internet of Things
Part-1: Introduction To The Article
In this series, we’ll cover the advantages of using JavaScript on development boards. For this purpose, we will use Espruino, which is an awesome open source firmware available for many development boards (they got their own boards too). Using Espruino has many advantages to it, one being that it is an interpreter, hence, it gives you instant feedback so that you can prototype and fix bugs easily. Espruino is a great tool that has many advantages over traditional C based programming on IoT development boards. Espruino is able to do so because it uses JavaScript for this purpose. So, why is JavaScript so advantageous over the traditional method? Let’s find out.
What is JavaScript for IoT?
JavaScript is a very lightweight compiled programming language. It was developed as a scripting language for Web development but soon started to expand into other spaces such as back-end development with Node.js or introduction of Apache CouchDB and Adobe Acrobat. JavaScript, popularly called JS, soon emerged as a fast pace developing language, which is prototype-based, multi-paradigm, dynamic language, having support for object-oriented programming, imperative and declarative styles.
Now the language that was just designed for the Web soon emerged everywhere and is still growing. On March 6th 2019, TensorFlow.js 1.0 was introduced to the large community of JS developers. This was the first time such a large Machine learning library was brought to JavaScript.
The list of what can be achieved with this language goes on and on, but here we’ll concentrate on one aspect of this language that makes it perfect for IoT development.
So What’s The Benefit Of Using JavaScript for IoT?
This question can be answered in many ways, some are listed below:-
- Event-driven model →JavaScript is an event-driven language that we can take advantage of for IoT development. Event loops present in JS allows the developer to respond to events in real time, handling multiple tasks at once without waiting for any other tasks to get completed.
- Async →This allows our code to be non-blocking so that it does not wait for any response from a function or command and continues to run the rest of the code.
- Bigger developer circle →JS is a very popular, relatively easy language to learn and to get along with, therefore it has a relatively bigger developer circle allowing more exposure and development for the IoT sector too.
- The ability to use Read-Eval-Print-Loop →This is something very unique that interests me a lot. This means that you can simply interact with the development board using something similar to a CLI and there is no need to compile and upload the code as a whole. This really increases the prototyping speed on small scale projects. We’ll see an advantage of this later in the article when we use Espruino on NodeMCU.
- JSON handling- We all know the ability of JavaScript in the world of Web, especially due to JSON. Yes, running JavaScript on the IoT development board also allows the developer to handle and play around with JSON data more easily.
These were only a few advantages of using JavaScript as the programming language for development boards, as we go further in this article and articles that follow we’ll continuously see some more advantages of using JavaScript for IoT. So let’s see what it takes to run JavaScript on a simple low-end development board.
What Will We Need?
We’ll need the following items for this project →
- NodeMCU (This is what I‘ll be using) → NodeMCU is an open source IoT development board. It has features like WiFi inbuilt and has many I/O pins and only one analog pin. We are using this board as it’s cheap and does really good work for its money when compared to other development boards. This board also supports features like “Deep Sleep” that allows it to save a lot of battery, eg:- if the board requires to take a sensor reading every 5 seconds, it would power up only then, take the reading and go back to sleep.

NodeMCU
2. Temperature Sensor (Here I am using the LM35)
Now let’s Set Up Espruino On Our NodeMCU
Getting Things Ready →
The first thing is to properly setup Espruino firmware on the NodeMCU board so that we can go on with the article. For doing this we’ll require a proper Espruino firmware for our NodeMCU development board.
We’ll require a tool called Esptool. This is a python tool that will help us with setting up Espruino. Make sure you have this python tool up and running, you can refer the below link for guidance on how to install and to know more about this tool → esptools — PyPI
I would recommend that you use python version above 3 in place of python version 2 and use “pip3 install esptool” .
After installing the required tool, make sure your board is connected to your PC via USB cable ( I am assuming that you have already installed the USB drivers required for NodeMCU, if not please follow this link → Driver Installation NodeMCU ). To get started run the following command in the terminal of any Linux distro or in the Command Prompt on Windows (make sure esptool is installed already).
*Replace MySerialPort with the port your board is connected to.
https://medium.com/media/ee65e8baa7a007ffea8ab34eb9f98d2d/href
On running this you’ll get somewhat similar results as below:-
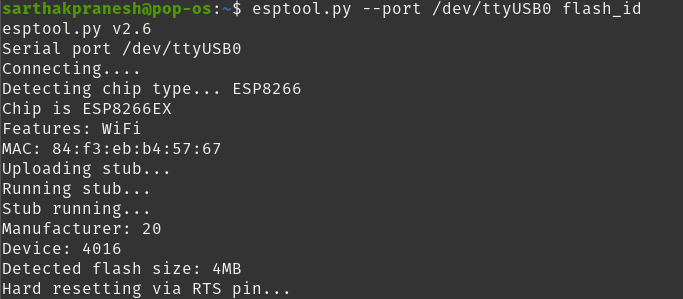
Make sure you run the command with the right serial port else you’ll get an error (On Windows the serial port will start with “COM”)
Here all we are looking for is the “Detected flash size” value. You can clearly see my NodeMCU has an ESP8266 chip containing a 4MB flash size.
Now what we need is all the right resources so that we can use JavaScript on our NodeMCU. For this purpose, I have bundled all the resources that we are going to need into a Github repo (link below). Please either clone or download this resource from the Github page.
After you have downloaded or cloned the files from the link above, the first thing to do is some cleaning on your chip. Yeah, you heard it right, Cleaning. We need to completely remove the older firmware and any other thing stored in the flash memory of our NodeMCU. For doing so we run the following command with MySerialPort representing the port your device is connected to.
https://medium.com/media/bc704504b2005447ee0de5d72e5f7f20/href
This command should return something similar to below.

The second last line confirms that the cleaning of our chip’s memory was a success.
Now we are ready to introduce our board to its new best friend “The Espruino”.
Welcome Espruino →
Now it’s time we flash the new Espruino firmware to our NodeMCU. Before doing this please find the folder with the name “Espruino-firmware” inside the downloaded resources and make sure you execute the command below from inside of that folder ( hint:- use the cd command to reach that directory )→
https://medium.com/media/1de5c5f9cd7f33d6b409d530f65616f4/href
Note: Remember to change the MySerialPort to the port your device is connected to.
I won’t be going in depth with this command as it involves things related to interfacing with the hardware, flashing the firmware on it and nothing more.
Now our NodeMCU is ready to utilize the power of JS.
Getting The IDE
Before we get started let’s set up our little environment where we can code JS and interact with our NodeMCU.
For doing so we need to add a Google app to our Google Chrome browser. If you don’t use Google Chrome I’d like to request you to get it for this purpose. Please add the following app to your browser before you continue.
After the IDE opens up you’ll see a window like this →

Setting Up The IDE
Now what we want to do is click on the settings icon on the top right-hand side of the IDE window and go to Communications as shown below:-

In the Communications menu Change the Baud Rate to 115200. By doing this we tell our IDE what speed/rate it needs to use while it communicates with our NodeMCU.
Now we are all set to run JS on our NodeMCU. So why wait let’s get started.
Connecting The Board To The IDE
Click on the yellow connection icon on leftmost top of the screen and select the port on which the device is connected. As soon as the device gets connected, the IDE should look like below (or something similar).
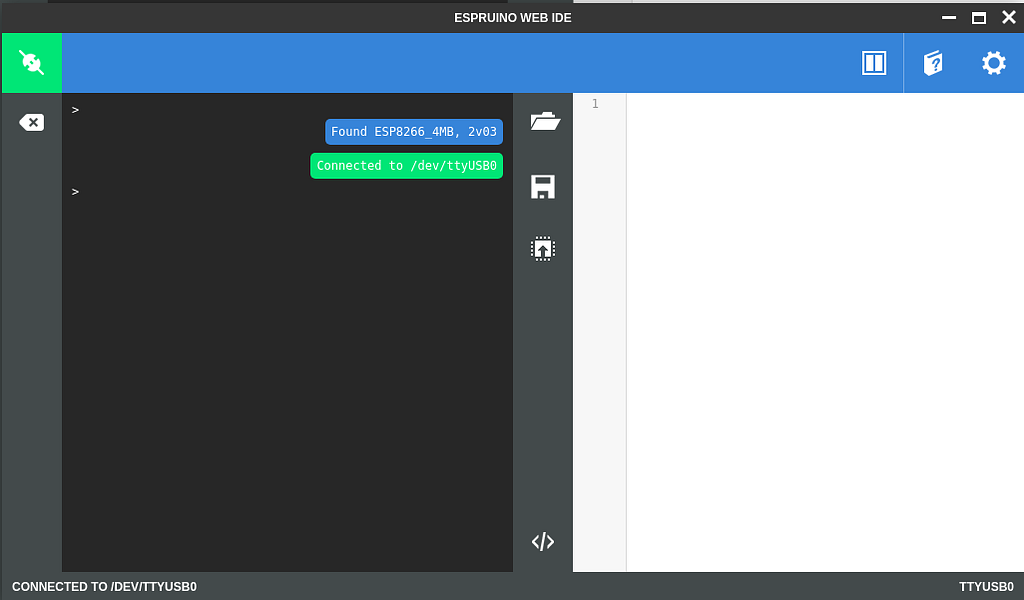
In case of an error, disconnect the NodeMCU from your PC and reconnect it again.
Most of the development boards have some or the other LED inbuilt. Same is the case with the NodeMCU. For verification, we can turn on the inbuilt led on the NodeMCU board.
Here we write a simple program to turn on the inbuilt led on NodeMCU.
Write the following code in the terminal panel of the IDE:-
https://medium.com/media/edb5a53741f9ec50b5ca0a7f95823c53/href
And press Enter. This should return “undefined” in the terminal and the inbuilt led on the board should light up indicating all went well.

One major advantage of using Espruino here is that it has the ability to take commands directly from the terminal window or REPL. This increases prototyping speed and comes very handy as you don’t need to compile the whole code and upload it as in the case with Arduino.
Now as we have gained some ground let’s connect the NodeMCU to our personal hotspot.
Connecting The board To Personal HotSpot
For doing so load in the following code in the script editor window and hit “Send to Espruino” button.
https://medium.com/media/44b3853678c46bd2d10a64f36f7ed672/href
In the code replace “YourSSID” with the name of your hotspot (eg:- “Sarthak”) and “YourPassWord” with the password of your hotspot (eg:- “qwertyuiop1234”). Also, make sure that the AP band of your hotspot is set to 2.4 GHz (You can find this in your settings menu under portable hotspot)
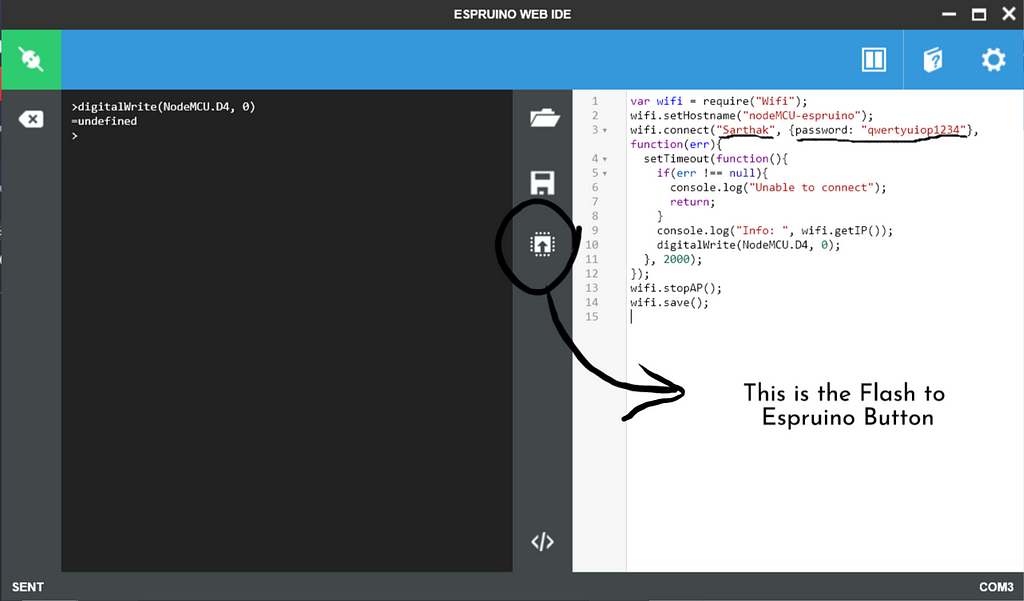
Hit the Send to Espruino button to send the code to the NodeMCU.
If everything goes well you’ll get the following in the terminal.

Now let’s break down the necessary part of the code for a better understanding of what it does →
- var wifi = require(“WiFi”) → if you are not familiar with JavaScript, then this is the simple way of loading libraries that others have written so that you can utilize them in your code.
- wifi.setHostname(“nodeMCU-espruino”) → this will set the device name of your NodeMCU as “nodeMCU-espruino”. This can be anything, you can put your name as well.
- wifi.connect(“YourSSID”, {password: “YourPassWord”}, function(){…}) → this function tells our NodeMCU to connect to the wifi which has a name as “YourSSID” using the password for the wifi as “YourPassWord”. This function takes in a callback function as the third argument. This callback function gets called after the function is executed.
- setTimeout() → this function helps us in running some code after a particular interval of time.
- wifi.getIP() → this function returns the information about our NodeMCU like its IP address and other useful information.
- wifi.save() → saves the information or credentials of the wifi/hotspot locally on the board itself ( WiFi information persists across hard-resets and power cycles after using this command ).
Now, let us dig deeper into it.
What’s ThingSpeak?
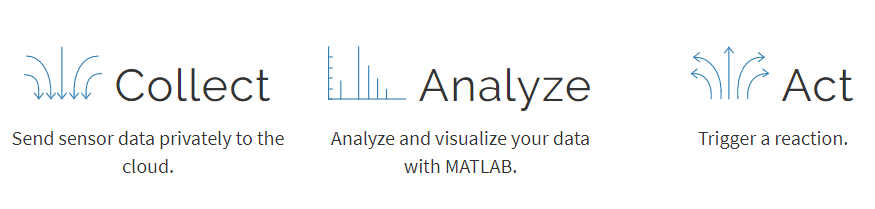
According to its developers, “ThingSpeak is an open-source Internet of Things (IoT) application and API to store and retrieve data from things using the HTTP protocol over the Internet or via a Local Area Network” — Wikipedia
ThinkSpeak, as mentioned above, is an open-source IoT application on which you can store any sort of sensor data that your development board might receive from any sensor connected to it.
If you don’t already have an account on ThinkSpeak, please make one. After making an account on ThinkSpeak, when you log in you’ll get the following window →
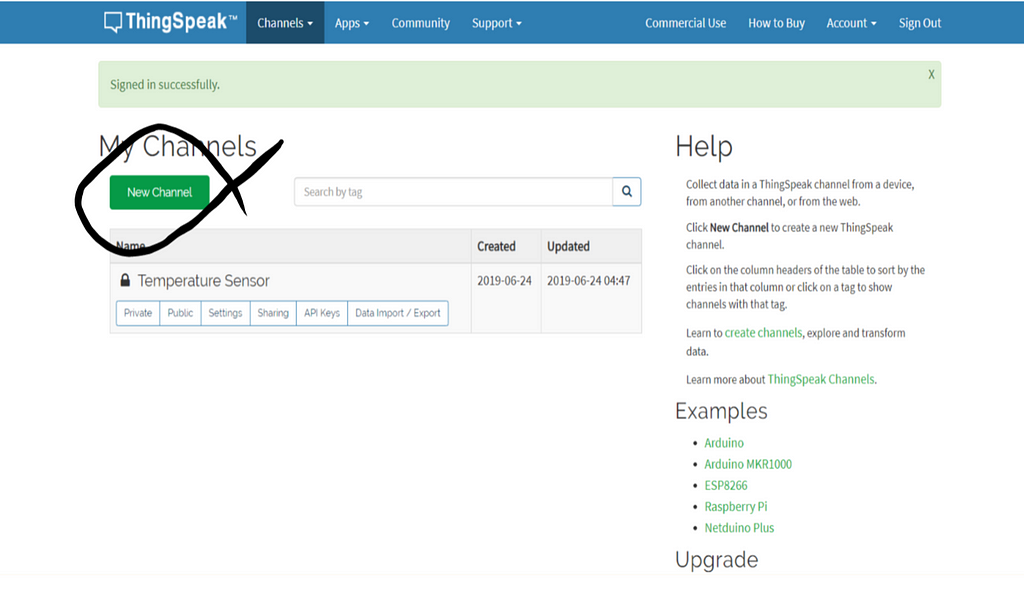
Please click on the “New Channel” button present under the “My Channels” column. When you click on it you’ll get a series of different options and text fields, don’t worry you won’t need to fill in much for now.
Just make the following changes and press the “Save channel” button at the bottom.

Important → Please make sure that the checkbox in front of the Field 1 row is selected.
After you press the “Save channel” button, a new channel will be created on which you can send sensor data from your NodeMCU.
Now you are all set to use ThinkSpeak with Espruino, so let’s get started.
Sending Artificial Data To ThinkSpeak
Before jumping into sending the real temperature data by using LM35, we’ll try to send artificial data that we’ll generate in the code itself.
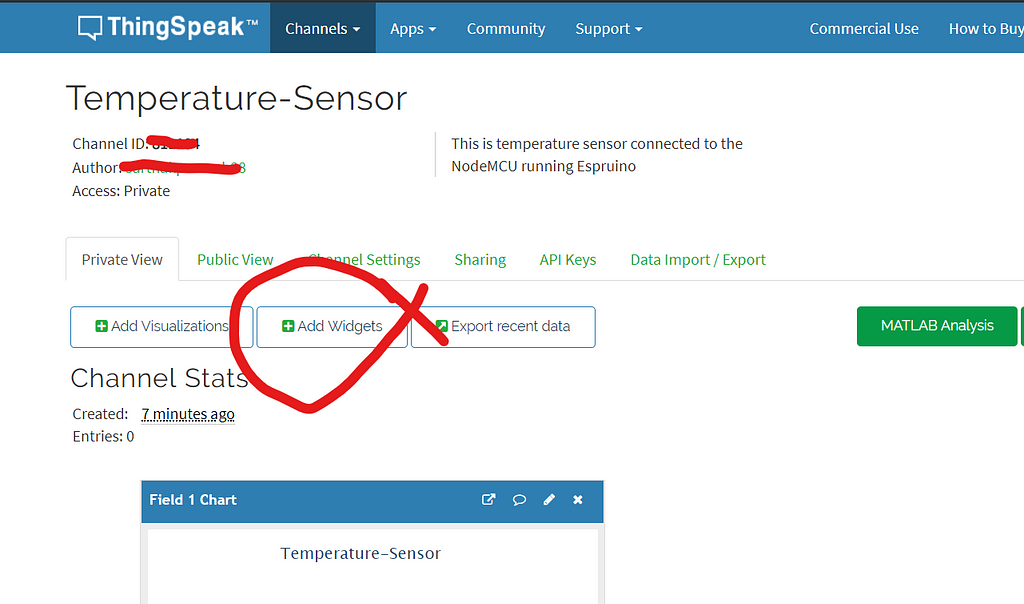
First, in your ThinkSpeak channel click on the “Add Widget” button →
After clicking on it you’ll find three options, select the Numeric Display →

After selecting it, click next, and you’ll get more options regarding your widget. Please make the following changes in the options →
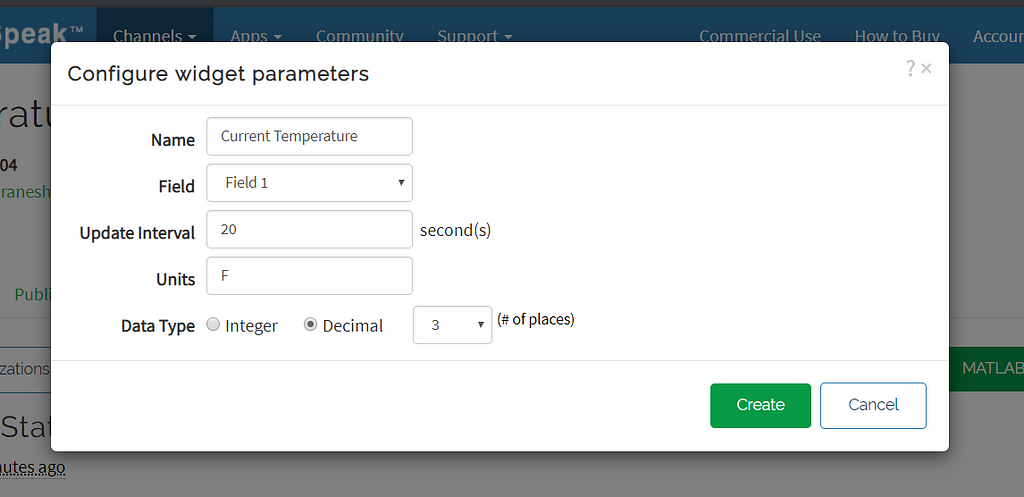
Here “Name” is the name of your widget that will be added to your channel. This widget will get its information from the “Field” option that is set to Field 1. The interval tells the widget about how frequently it needs to update its value. After making these changes hit “Create” and you’ll see your widget added to the channel →

There is one more widget that is already added to our channel. We’ll use this widget to plot a graph of the falling and rising temperature. The “Field” option of this widget is already set to “Field 1” by default and we don’t need to change it.
Moving on towards the JavaScript code.
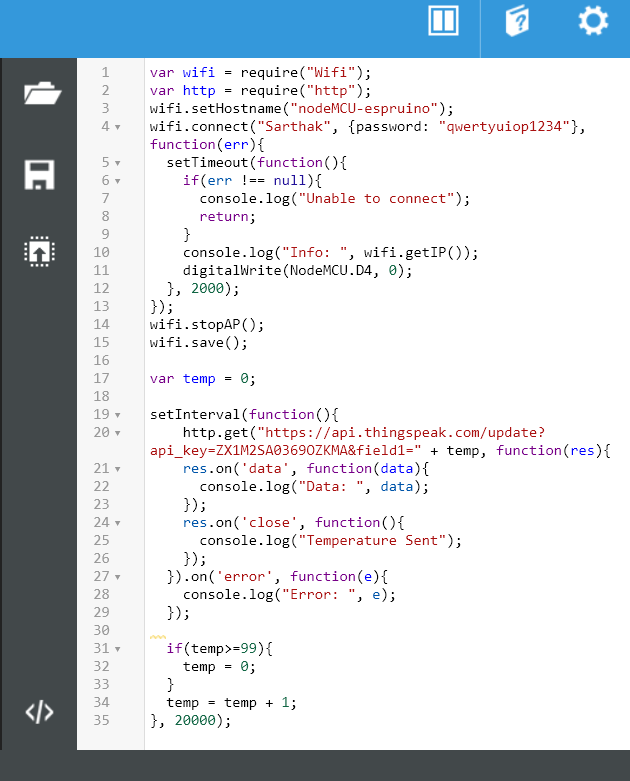
You’ll require the code below to generate artificial data and send it to the ThinkSpeak channel. The below code generates temperature data from 0 to 99 and then again starts from one. Each integer created in this range goes to ThingSpeak as the artificial temperature in each 20s.
https://medium.com/media/8e0425214ae950146a43f9d218fda42f/href
The starting 15 lines are for connecting the NodeMCU to the personal hotspot you created. Also, notice that we have included one more library called the “http”, this library helps in making web requests, such as a GET request. The following code after that is for generating and sending artificial data to the ThinkSpeak channel. Remember to feed in your WiFi details in this code too. Also, there is one more change that you need to make, that is you need to replace the “YourUpdateFeed” in line 20 with a URL specific to your account.
To get this URL, go back to your ThingSpeak channel and open the “API keys” page →
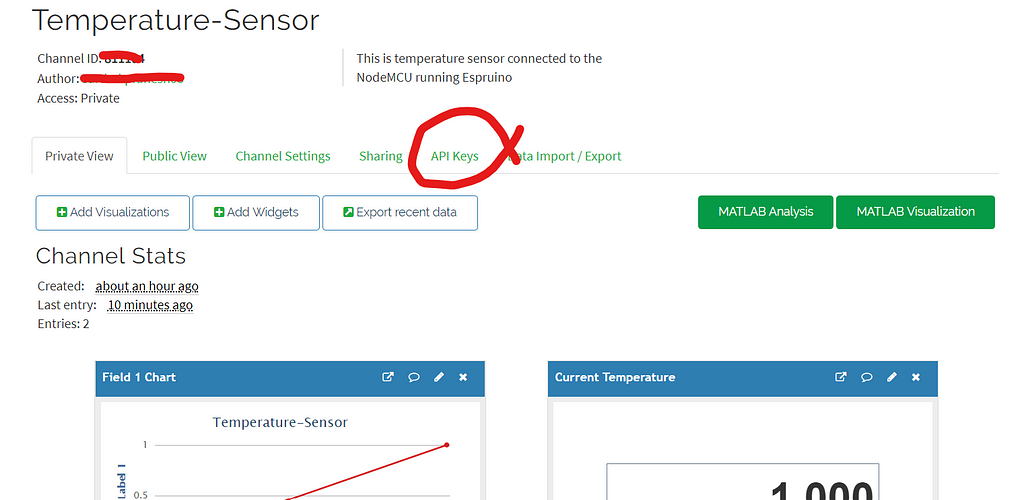
After you open up this tab you’ll find Keys that are generated for your channel and are private to you, make sure you don’t give these keys to anyone else or your channel data may not remain private.
Scroll down and find the API requests section on the page and copy the URL in the “Update a channel feed” section as shown below →
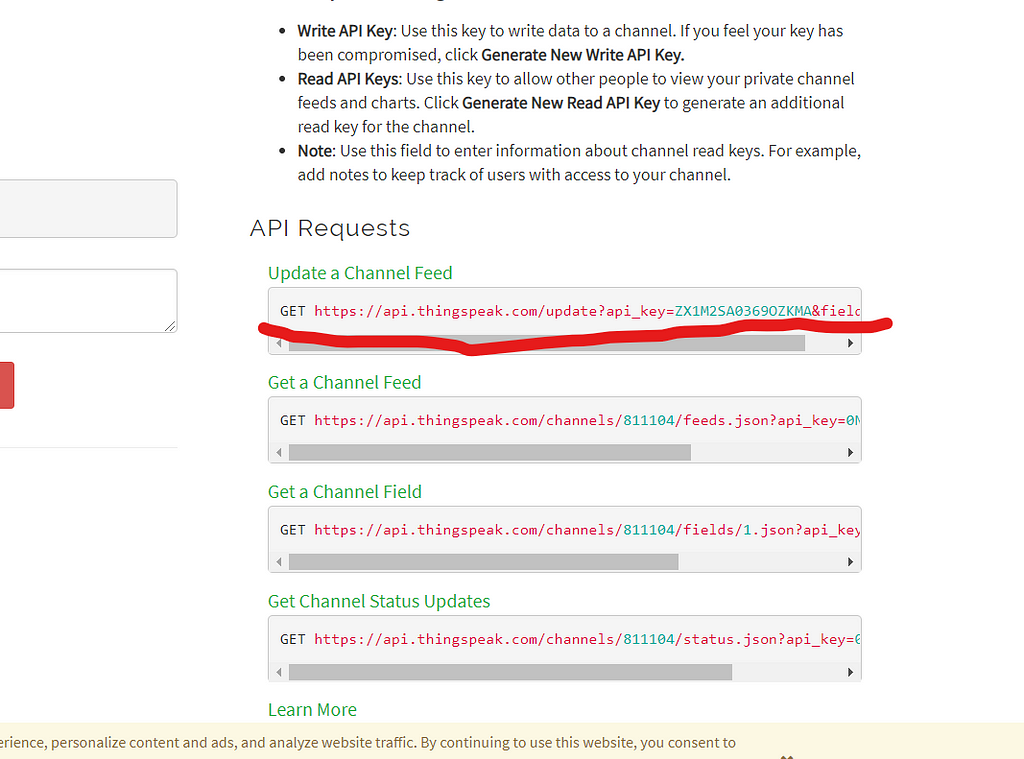
Make sure you only copy the URL and not the GET keyword
Now paste the URL as a String in place of the “YourUpdateFeed” keyword. Your final code should look like below with your own private key in place.
( Also make sure that you remove the 0 from the end of the string URL or the value 0 will be sent to ThinkSpeak in place of our artificial data )
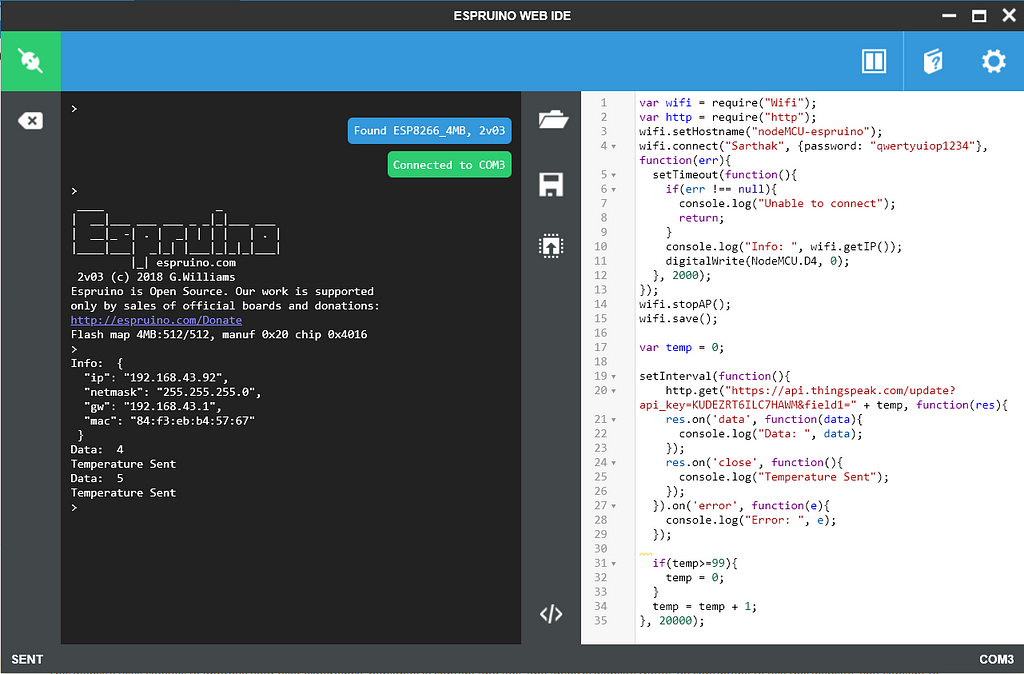
After everything is set, hit the “Send To Espruino” button and after a few seconds open your ThinkSpeak “Private View” and you’ll see your artificial data has started to come both in the form of a graph as well as the current value. Also in the Web IDE, you’ll see that the count of data stored in ThinkSpeak is printed each time the data is sent to ThinkSpeak.
After you have achieved this we are ready to connect our temperature sensor “The LM35” to our NodeMCU.
Adding LM35 To The Hack

LM35 is a temperature sensor which can measure temperature in the range of -55°C to 150°C. It is a 3-terminal device that provides an analog voltage proportional to the temperature. Higher the temperature, higher is the output voltage
Take three jumper wires and connect them to the NodeMCU, in the following fashion →
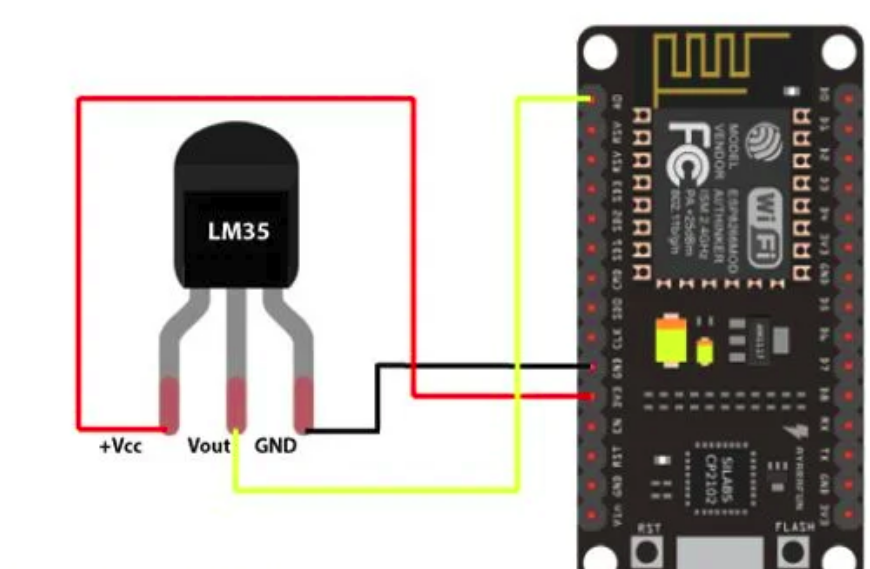
Source:- https://www.instructables.com/id/Interface-LM35-With-NodeMCU/
A0 pin on the NodeMCU should be connected to the terminal in the middle, connect any 3v3 pin on the NodeMCU to the leftmost terminal keeping the flat side of the LM35 towards you and the rightmost pin of LM35 should be connected to the ground pin on NodeMCU represented by GND or just G. You can use a breadboard for this purpose or just use female-to-female connectors to connect LM35 directly to the NodeMCU.
After making these connections you have to change the previous code as follows →
https://medium.com/media/777abb5609667efee12907a11e085ebf/href
Notice here we have tweaked the code a bit so that it also prints out the temperature that was sent to the ThinkSpeak channel.
After you have written this code in your IDE we are ready to send temperature data to our ThinkSpeak channel. Click “Send To Espruino” and make sure you get the temperature data printing on the terminal first. After the data has started coming on the terminal you can go to your ThinkSpeak channel and see the graph of temperature along with the current temperature being showcased.
Wrapping Up
The article gave us a brief idea of what can be done by running JavaScript on development boards. But of course this is not all, the possibilities of what can be achieved by running a language like JavaScript on development boards are still being explored and the outcomes are extraordinary.
In our next article “JavaScript loves Internet of things Part-2” we will explore how we can make our own server, configure our NodeMCU to utilize this server and solve even more interesting problems.
Till Then Stay Tuned!
JavaScript Loves Internet Of Things was originally published in Techloop on Medium, where people are continuing the conversation by highlighting and responding to this story.